

Shopify image optimization matters because images are usually the heaviest assets on a product page. In the 2025 Web Almanac, images made up more bytes than any other content type on the median home page, at about 1,058 KB on desktop. That makes them a major factor in Largest Contentful Paint (LCP), mobile performance and visibility in Google Images.
Shopify already handles part of the work. Its CDN can serve WebP or AVIF and generate responsive image sizes automatically. What it does not do is rename your files, write alt text, or resize and compress the original image before you upload it.
This Shopify image optimization guide, updated for 2026, explains what Shopify handles automatically, what still needs your attention, recommended Shopify image size and file-size targets, and which tools and apps can automate the process.
What is image optimization for Shopify, and why does it matter?
Shopify image optimization is the process of preparing and delivering images so your store loads quickly, ranks well, and remains sharp across different devices and screen sizes.
It covers four main areas:
-
Format: choosing the most efficient file type for each image.
-
Compression: reducing image file size without unnecessary quality loss.
-
Sizing: matching image dimensions to the space where the image appears.
-
Delivery and metadata: using Shopify's CDN, responsive images, lazy loading, file names, and alt text effectively.
For image optimization, Shopify handles much of the delivery layer. Preparing the source image is still your responsibility. That split is one reason two stores using the same Shopify theme can have very different page-speed results.
Why Shopify image optimization matters:
-
Speed and Core Web Vitals. On many product pages, the largest visible element is a product image, so its loading time can determine LCP. Unsized images can also cause layout shifts, while unnecessarily heavy pages can reduce responsiveness.
-
Conversions. Google research found that the probability of a visitor bouncing rises by 32% as page load time increases from one second to three. Slow or blurry product imagery can also reduce shopper confidence.
-
Image search traffic. Images appear in roughly 19% of the Google results tracked by MozCast. Descriptive file names, relevant alt text, and image sitemap coverage give shoppers another route to discover your product pages.
-
Accessibility. Accurate alt text helps screen-reader users understand informative product imagery.
Who this guide is for: Store owners and marketers can follow the practical steps without technical knowledge. Developers will also find specific Liquid recommendations throughout the guide.
Shopify image optimization best practices 2026 at a glance
If you only have five minutes, these are the numbers and rules to work from:
-
Shopify product image size: aim for 2048 × 2048 px for square product images, using JPEG unless you need transparency.
-
File size: target roughly 200–300 KB for a main product image and about 100 KB or less for thumbnails.
-
Format: upload JPEG or PNG and let Shopify's CDN serve WebP or AVIF to supported browsers.
-
Image file names for SEO: use descriptive, lowercase file names separated with hyphens.
-
Shopify image alt text: keep informative alt text concise, ideally 125 characters or fewer.
-
Lazy loading images: enable it below the fold, but not for your LCP image.
-
Core Web Vitals targets: LCP under 2.5 seconds, CLS under 0.1 and INP under 200 ms.
The rest of this Shopify image optimization guide explains why these recommendations matter and how to apply them across your store.
What Shopify optimizes automatically, and what is still up to you?
Shopify automatic image optimization is useful, but it has limits.
Shopify's documentation states that original images are not compressed when you upload them, helping preserve their original quality. When those images are delivered through a Shopify theme, however, Shopify can serve resized versions and more efficient formats depending on the visitor's browser and device.
Shopify image optimization features built into the platform
Shopify image optimization features already built into the platform include:
-
CDN delivery. Images uploaded through Shopify admin are delivered through Shopify's global CDN.
-
Automatic format selection. Shopify can serve WebP or AVIF to browsers that support them and converts GIFs to animated WebP where appropriate.
-
Responsive image sizes. Shopify generates smaller versions of uploaded images, while modern themes use
srcsetso the browser can select an appropriate size. -
Lazy loading in modern themes. Online Store 2.0 themes such as Dawn and the Horizon family progressively load images where appropriate.
Together, these Shopify automatic image optimization features reduce how much manual delivery work merchants need to manage.
|
Area |
Does Shopify do it? |
What you do |
|
WebP/AVIF by browser |
Yes |
Upload JPEG or PNG |
|
Responsive sizes and CDN |
Yes |
Use a current theme and upload through Shopify admin |
|
Compression at upload |
No, originals are stored as uploaded |
No, originals are stored as uploaded |
|
Resizing the original |
No |
Resize to about 2048 px before upload |
|
File renaming |
No |
Rename before upload |
|
Alt text |
No |
Write it in Shopify admin or use an app |
|
Sitemap image coverage |
Partial, primarily the product's main image |
Extend coverage with an app or crawl |
|
Color profile |
Removed on display |
Removed on display |
Because Shopify can apply additional processing when delivering an image, uploading a huge original does not automatically give you better visual quality. A well-prepared source file gives you more control over the balance between sharpness and file weight.
Shopify's documentation indicates that manual compression is not required. In practice, Shopify image compression before upload can still be worthwhile when you want more predictable file sizes and visual quality.
12 proven Shopify image optimization tactics
These Shopify image optimization best practices move from the fundamentals of image dimensions, compression and file format through to SEO, accessibility and ongoing performance monitoring.
Resize images to match display requirements while maintaining image quality
Shopify image size affects visual quality, file weight and layout consistency.
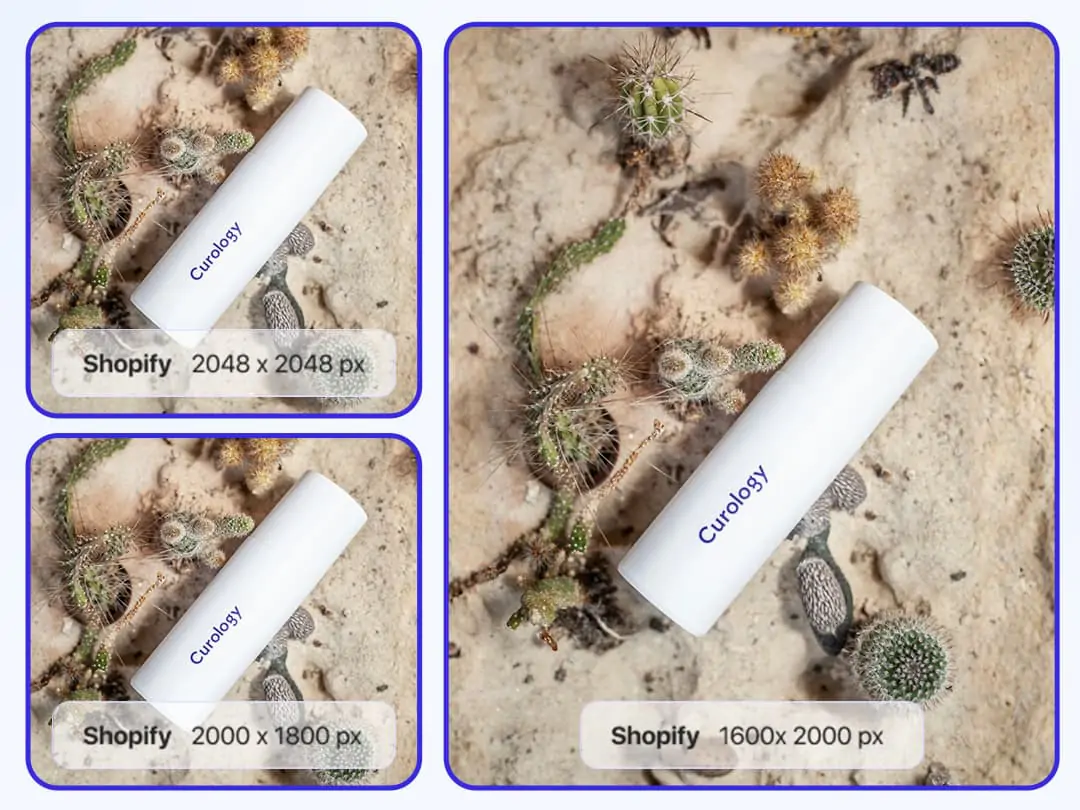
For square product images, 2048 × 2048 px is a useful benchmark recommended by Shopify. This Shopify product image size is large enough to support high-density screens and Shopify product image zoom without forcing shoppers to download unnecessarily huge source files.
Shopify product image zoom requires images larger than 800 × 800 px, while around 1024 × 1024 px is a sensible minimum for product photography if 2048 px is not practical.
Upload limits: Shopify's documented limits are 20 MB and 20 megapixels. A square image therefore reaches the pixel limit at roughly 4472 × 4472 px. Shopify's Help Center also gives a 5000 × 5000 px, or 25 MP, image as an example of an image that is too large. If an image fails to upload despite being below 20 MB, check its pixel dimensions.
Keep a consistent Shopify image aspect ratio. Product images within the same collection should ideally use the same shape, such as 1:1 or 4:3. Consistent cropping keeps product grids aligned and reduces unexpected layout movement.
For banners and hero images, use Shopify's focal point feature to keep the most important part of an image visible when a theme section crops it. Focal points work with the Horizon family and recent versions of free themes such as Dawn. Many themes also offer an Adapt to first image setting that can reduce unnecessary cropping.
For blog and page images, choose Original size in the editor instead of Large, Medium or Small where appropriate, so Shopify does not insert an unnecessarily scaled-down source.
Why do Shopify images sometimes look blurry at first? Some themes initially load a smaller image and then replace it with the full-resolution version as part of lazy loading. A brief transition can therefore be normal. Persistent blur usually means the original file is too small.
Compress images before uploading to reduce file size without hurting quality
Shopify image compression should reduce image file size while keeping the image visually sharp enough for shoppers.
There are two main types of compression:
-
Lossy compression removes some image data to produce a much smaller file. It works well for product photography, often at around 75–85% quality.
-
Lossless compression preserves all image data and is better suited to logos, icons, and graphics containing text.
Recommendations online vary considerably. Shopify UK suggests around 200 KB or less; Shopify's image-size guidance references roughly 300 KB for product photography, while some SEO tools recommend much smaller files.
Trying to force every 2048 px product image down to 70 KB can create visible artefacts. A more practical starting point is:
|
Image type |
Starting target |
|
Main product image |
≤ 200–300 KB |
|
Collection and thumbnail image |
≤ 100 KB |
|
Hero or banner image |
≤ 500 KB |
|
Blog image |
≤ 200 KB |
Treat these as starting points rather than absolute limits. Product detail, colour gradients and image complexity all affect how far you can compress images without losing quality.
How to compress images well:
-
Resize first, then compress. Smaller pixel dimensions require less aggressive compression.
-
Use a tool such as Squoosh, TinyPNG or ImageOptim rather than applying maximum compression automatically.
-
Inspect the exported image at zoom level for artefacts, particularly around skin, fabric, shadows and colour gradients.
-
Keep the untouched original so you can re-export it later.
-
Export in sRGB without relying on an embedded colour profile. Shopify removes colour profiles when images are displayed, so embedded profiles can sometimes affect colour appearance.
If you do not want to handle Shopify image compression manually, a Shopify image optimization app can process existing files after upload.
For stores with ongoing product uploads, Shopify automatic product image optimization can also be handled through an app that automatically processes new images as products are added.
Whichever approach you choose, use one Shopify image optimization tool for compression rather than stacking several tools that could process the same image twice.
Choose the right file format to balance quality and load speed
File format has a significant effect on image size and clarity.
|
Format |
Compression |
Transparency |
Best for |
|
JPEG |
Lossy |
No |
Product photos, banners and blog images |
|
PNG |
Lossless |
Yes |
Logos, icons and graphics requiring transparency |
|
WebP |
Lossy or lossless |
Yes |
Photos and graphics served by Shopify |
|
AVIF |
Lossy or lossless |
Yes |
Detailed photography served by Shopify |
|
SVG |
Vector |
Yes |
Logos and simple icons |
WebP files are typically 25–35% smaller than comparable JPEG files, while AVIF can be smaller again.
You usually do not need to create those formats yourself. Shopify automatic image optimization can detect browser support and deliver an appropriate format. For most merchants, the simplest workflow is to upload a well-optimised JPEG for photography and use PNG only where transparency is required.
Formats Shopify accepts: JPEG, progressive JPEG, PNG, GIF, HEIC and WebP. PSD, TIFF and BMP can also be uploaded but are converted to JPEG or PNG. Camera RAW formats are not listed as supported upload formats, so export those files to JPEG first.
SVG files can be uploaded but cannot be resized or cropped through Shopify in the same way as raster images unless a rasterised version is requested.
For developers: you do not normally need to build a <picture> element purely to serve WebP on Shopify because Shopify's CDN already handles modern image delivery.
Enable lazy loading to improve page speed, especially on mobile
Lazy loading images delays their download until they are close to entering the viewport. This reduces the amount of data required during the initial page load and can improve mobile performance and Core Web Vitals.
For Shopify stores:
-
Check your theme. Online Store 2.0 themes such as Dawn and Horizon generally support native lazy loading. Inspect an image in your browser and look for
loading="lazy"on the<img>element. -
Check important templates. Review files such as
product-card.liquid, collection sections and featured-product sections to confirm that below-the-fold imagery is handled correctly. -
Add lazy loading where it is missing. Custom Liquid sections and some app-generated components do not always include it.
-
Do not lazy load your LCP image. The first visible product image or hero banner should load immediately. Applying lazy loading to it can delay LCP.
-
Use
fetchpriority="high"for the main above-the-fold image where appropriate. -
Set width and height attributes so the browser can reserve layout space before the image finishes loading.
Managing lazy loading images correctly is particularly important when optimising Shopify for mobile, where long collection and product pages can otherwise trigger unnecessary downloads during initial load.
Use clean, SEO-friendly file names to support image indexing and overall page SEO
Image file names for SEO should tell search engines and users what an image represents without becoming keyword-stuffed.
Shopify does not rename uploaded files automatically. If you upload IMG_0023.jpg, that file name remains part of the image URL.
For better Shopify image SEO:
-
Describe the image clearly: use
black-leather-wallet.jpginstead ofIMG_1234.jpg. -
Use lowercase letters and hyphens. Google has previously indicated that underscores can cause words to be interpreted differently.
-
Use relevant search terminology naturally. Do not force target phrases into every image name.
-
Match the file extension to the actual file type.
-
Add location only when it genuinely provides useful context, such as
storefront-berlin.jpg.
Shopify image optimization for SEO also means cleaning up older assets where practical.
Large stores can use Shopify bulk image optimization tools to rename files or process image metadata at scale. Apps such as Tiny SEO, Crush, and Hextom's bulk editor include relevant bulk-editing functionality.
Do not rely on GPS, IPTC, or other metadata embedded inside an image file to provide search context. Put useful information in places users and search engines can reliably interpret, including descriptive file names, Shopify image alt text, and surrounding page copy.
Add descriptive alt text to improve SEO and accessibility
Shopify image alt text helps screen-reader users understand informative images while also giving search engines useful context about what those images contain.
Shopify does not automatically write alt text for product images, so merchants need to add it manually or use an app.
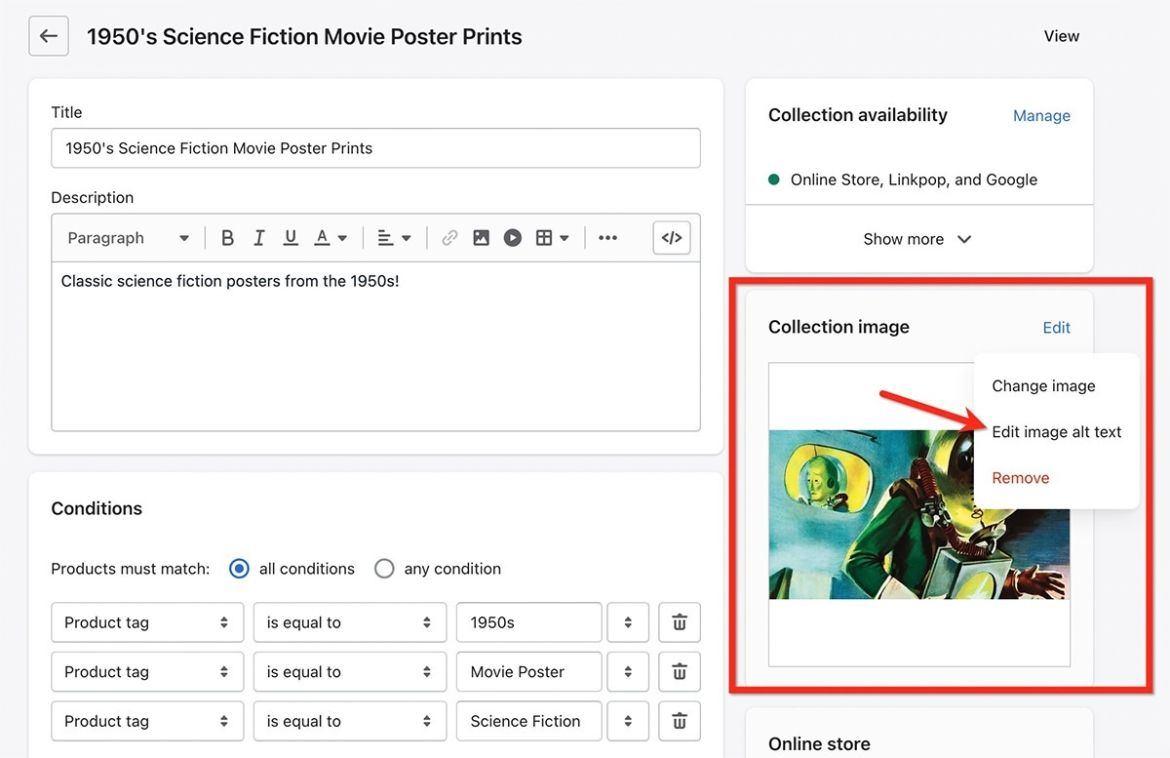
How to add alt text: go to Products, open the relevant product, click an image under Media, choose Add alt text, enter the description and save.
Best practices for alt text for product images:
-
Describe what is actually visible.
"Brown leather jacket with a zip"is more useful than"jacket". -
Aim for 125 characters or fewer where possible. Shopify allows more, but shorter descriptions are easier for screen-reader users to process.
-
Include a model or serial number when it genuinely identifies the product.
-
Avoid keyword stuffing. Use a target phrase only when it naturally describes the image.
-
Use empty alt text (
alt="") for decorative images so screen readers can skip them. -
Include location naturally when it matters, for example
"Interior of our Brooklyn retail store". -
Do not rely on the HTML
titleattribute for image SEO.
For large catalogues, a Shopify image optimization app can generate draft alt text from product information. Free AI tools can also help create first drafts, but automated descriptions should always be reviewed for accuracy before publication.
Use image sitemaps to help Google discover and index your images
An image sitemap is a file that tells Google which images exist on your store and where to find them.
While search engines can often find images on their own, some images, especially those loaded through JavaScript or app blocks, may be missed unless they’re included in a sitemap.
Submitting and enhancing your image sitemap helps more of your product and lifestyle images appear in search results, which can drive additional traffic and improve your store’s visibility across image-rich search queries.
How Shopify handles sitemaps:
Shopify automatically creates a sitemap for your store at yourstore.com/sitemap.xml. This includes all product, collection, blog, and page URLs — along with image data for standard images uploaded through Shopify’s admin.
However, this sitemap may not include all images, especially those added using:
-
Custom code
-
Theme modifications
-
Third-party apps or page builders
-
Lazy-loaded or dynamically inserted images
How to improve image sitemap coverage
-
Enhance your sitemap with SEO apps: Use an SEO app like TinyIMG or Smart SEO to create a more complete image sitemap that includes all image URLs, even those that Shopify’s default sitemap may skip. This ensures Google receives the most complete version of your sitemap from the start. Choose tools that:
-
Automatically scan your store and include missing images
-
Update the sitemap whenever new image content is added
-
Submit your sitemap to Google Search Console:
Once your sitemap is ready, submit it so Google can crawl and index it: -
Go to Google Search Console > Index > Sitemaps
-
Enter your sitemap URL: https://yourstore.com/sitemap.xml
-
Track indexing using the Coverage and Image reports
Add location keywords to image names, alt text, and content to support local SEO
Images can help with local SEO when they include clear references to places your business operates. Adding place names to image file names, alt text, and on-page content gives search engines more context about your business’s location and helps you show up in relevant local searches.
This is especially useful for stores with multiple locations, local pickup options, or strong regional branding (e.g., “Made in Melbourne” or “Designed in Brooklyn”).
How Shopify handles location context in images
Some merchants and photographers embed geo metadata (such as GPS coordinates or city names) into image files using tools like Photoshop or GeoImgr, with the intent of improving location relevance or supporting local SEO. However, Shopify does not retain embedded geo metadata (such as EXIF or IPTC tags) when you upload images. This means any location data added inside the image file itself, like GPS coordinates or city names entered through photo editors, will be removed during upload.
Instead, Shopify supports location-based SEO by preserving visible content like image file names, alt text, and on-page text, all of which search engines can crawl and associate with a specific place. These elements are your primary way to communicate location relevance through imagery.
Best practices for local image context:
-
Include city or region names in your file names: Use clear, hyphenated file names that reflect the location shown. For example:
storefront-berlin.jpgorparis-boutique-display.jpg -
Write alt text that includes the location naturally: Write short, accurate descriptions that mention the place when relevant. For instance: “Interior of our Brooklyn retail store” or “Customer event at our Sydney flagship location”
-
Mention locations in surrounding content: Use image captions, product descriptions, or headings to reinforce the location. This helps tie your images to place-based search intent.
Use unique images for each store or brand to strengthen SEO and brand identity
If you're operating multiple Shopify stores under distinct brand identities, even if you're selling the same product, you should use unique images for each store or brand.
Google considers images part of your on-page content. If you use identical product or lifestyle images on different domains, it can trigger duplicate content signals and reduce the SEO value of those images. More importantly, visuals that don’t match each brand’s tone or audience can weaken shopper trust and reduce engagement.
Best practices for using differentiated images:
-
Change the setting or background: Photograph the same product in different environments, such as indoors for one store and outdoors for another. This gives each store a distinct visual identity while reducing the risk of duplicate image issues that can hurt SEO.
-
Use different models or angles: Switching the model, pose, or camera angle creates a new look and helps tailor the visual tone to different audiences. Even small changes like viewpoint or posture can make the image feel more relevant to each brand.
-
Overlay brand-specific elements: Add your logo, tagline, color filter, or other subtle branding details to each image. These touches reinforce brand identity and ensure the image file is technically unique for search engines.
-
Create alternate lifestyle scenes: Show the product in different use cases or environments, such as a city setting for one store and a home setting for another. This helps customers better imagine the product in their context and increases relevance.
-
Crop or reframe strategically: Adjust the focal point, zoom in on different features, or change the aspect ratio to create a distinct version of the same image. This allows you to repurpose existing visuals without reshooting.
-
Use AI tools to adapt visual context: When appropriate, use AI-powered tools to modify the background, change lighting, or simulate new scenes. This is a fast and cost-effective way to create image variations that still feel brand-aligned.
Serve images through Shopify’s CDN to ensure fast, global delivery
A CDN (Content Delivery Network) is a global system that loads images from the server closest to each visitor.
By using a CDN, your store’s images load from the nearest server to each visitor, which significantly improves speed and reliability, especially for international shoppers.
How Shopify handles image delivery:
Shopify automatically serves images through its global CDN (cdn.shopify.com) when you upload them through the admin or theme files. You don’t need to configure anything; Shopify takes care of image caching, compression, and delivery across regions.
However, this only applies to images hosted in Shopify. If you embed images hosted on external sources, like Google Drive, Dropbox, or third-party image hosts, those images bypass Shopify’s CDN and can be much slower to load or even unreliable.
Best practices for using Shopify’s CDN effectively:
-
Upload all store images through the Shopify admin: Product images, collection banners, blog visuals, and theme assets should be added directly via the Shopify dashboard to ensure they’re served through the CDN.
-
Avoid using externally hosted images: Linking to images from Dropbox, Google Drive, or third-party CDNs bypasses Shopify’s performance pipeline and may slow down your store.
-
Specify image sizes in Liquid using the
img_urlfilter: If you or your developer are adding images directly in Shopify theme files or custom blocks, use the img_url filter to tell Shopify what image size to serve. This ensures the image is resized correctly, loads faster, and is delivered through Shopify’s CDN with full performance benefits.
Use informative and customer-focused images to enhance customer experience
Image optimization isn’t just about speed and SEO; it also shapes how customers interact with your store and products.
Effective images answer common questions, reduce uncertainty, and highlight key product details. Whether it's a lifestyle shot, a texture close-up, or a customer-submitted photo, every image should help move the shopper closer to a decision.
Best practices for improving user experience with images:
-
Use images that match customer intent: For apparel, include on-model shots, multiple angles, and size or fit references. For beauty, include close-up texture shots and before-and-after use cases. Tailor your visuals to the kind of details shoppers expect to see before making a purchase.
-
Include real-world photos, including lifestyle imagery, behind-the-scenes content, or customer-submitted photos that show the product in context. This helps customers imagine the product in their own lives and builds credibility.
-
Use customer-generated photos to build trust and show real use cases: Let customers upload their photos in reviews or Q&A sections, then display them clearly and consistently in your theme. These images help new shoppers see real-world product use and boost credibility.
You can use review apps like Loox, Judge.me, or Ali Reviews to collect and manage this content. You should also check that images are sized properly, load quickly, and don’t appear distorted.
Audit image performance regularly to catch issues before they hurt SEO or speed
Even well-optimized images can slow down your store over time if new uploads aren't reviewed.
As your team adds new products, banners, blog posts, or app content, oversized or poorly compressed images can slip through. This often happens during busy campaigns or seasonal updates. Regular image audits help you catch and fix these issues before they affect site speed, SEO, or conversion rates.
Best practices for auditing image performance:
-
Focus on high-impact pages first: Start with your homepage, best-selling product pages, and key collection pages. These pages usually have the most traffic and contain prominent visuals like hero images or promotional banners.
-
Use tools to scan for image issues: Run your site through tools like Google PageSpeed Insights, GTmetrix, or TinyIMG’s audit feature. Look for common problems such as large file sizes, uncompressed images, or unsupported formats.
-
Reoptimize flagged images manually or with an app: Compress or resize any flagged images using tools like TinyPNG or Shopify apps that offer bulk image optimization. Fixing just a few heavy files can significantly improve load speed.
-
Repeat audits after design changes or content updates: You should build regular audits into your workflow to keep your store running smoothly. This is especially important after image-heavy updates, such as new seasonal banners or homepage layouts, which often introduce performance issues.
Shopify bulk image optimization: manual workflow vs apps
Manual image preparation works well for small catalogues.
Once a store reaches hundreds or thousands of images, or products are being added regularly, Shopify bulk image optimization becomes much more practical than processing every file individually.
A bulk image optimization app can automate repetitive work including resizing, compression, file-name changes and alt text management.
A simple decision rule:
-
Under about 100 images: a manual workflow using tools such as Squoosh or ImageOptim is usually manageable.
-
Hundreds of images or frequent uploads: consider a Shopify bulk image optimization app that can process your existing catalogue and handle new uploads automatically.
Pre-upload batch workflow
Before uploading images to Shopify:
-
Resize files to your target dimensions, such as 2048 px for square product photography.
-
Compress them using moderate quality settings.
-
Rename files with descriptive, lowercase, hyphenated names.
-
Export in sRGB.
-
Keep the untouched originals in case you need to re-export them later.
Photoshop batch actions, XnConvert and ImageOptim can apply repeatable processing to a folder of images in one workflow.
Fixing images already in your Shopify store
Older catalogues often contain oversized files, inconsistent dimensions and generic image names.
Shopify image optimization apps can scan existing files and process them in bulk. Many also keep temporary backups so you can restore an original if the result is unsatisfactory. Crush and LoyaltyHarbour, for example, report 30-day original-image backups.
Test any Shopify bulk image optimization workflow on a small group of images before applying it across your full catalogue.
Also check free-plan restrictions carefully. Some apps limit optimizations by file count or storage volume, and some allowances are one-time rather than monthly.
No app necessarily has access to every type of image stored or embedded in Shopify, so some assets might still require manual work.
Apps that support Shopify image optimization
Using the right apps can save you time and help maintain consistent image quality across your store. Below are recommended Shopify image optimization tools categorized by their main purpose - from compression and resizing to performance monitoring.
Apps for compressing images
These apps reduce file size without affecting visual quality, helping your store load faster and score better on speed tests.
-
TinyIMG SEO & Image Optimizer: Automatically reduces image file sizes by up to ~94% with minimal or no quality loss, using lossy or lossless compression. It supports WebP, bulk optimization, automated alt tag and filename generation, SEO audits, JSON‑LD output, and idle script control. This all-in-one tool helps load pages faster and improve search performance by improving both image delivery and SEO metadata.
-
Crush.pics – Image Optimizer: Applies intelligent compression using options like Balanced, Conservative, or Custom settings to shrink images while visually preserving quality. It also automates file renaming and alt tag updates for SEO and retains original images for 30 days with a restore option. This tool boosts site speed and search indexing by keeping image weight low and metadata optimized
-
Avada SEO Image Optimizer: Offers bulk image compression combined with automated alt text and structured data support to improve both speed and relevance. It helps reduce page weight and ensures images are better understood by search engines and customers.
-
Booster: Image Optimizer: Automatically compresses images and renames them using SEO-friendly keywords, improving loading speed and increasing the clarity of image file URLs.
-
TinyPNG (external tool): Allows manual, pre-upload compression of JPEG and PNG files via a free web-based interface. This tool helps merchants reduce image size before upload, giving more control and ensuring Shopify’s automatic compression doesn’t degrade quality.
For a full comparison of top Shopify compression apps across features, optimization performance, check out our detailed blog: Shopify Image Optimizer Apps
Apps for resizing images
These tools help standardize image dimensions across your store, ensuring a clean and consistent layout without performance issues.
-
Shopify Image Resizer: A free browser-based tool provided by Shopify for resizing images before upload. It is suitable for merchants with a small number of images who need a quick, manual resizing option without additional features.
-
Hextom: Bulk Image Edit & SEO: Allows bulk resizing by width, height, aspect ratio, or crop, with additional padding options. This app is useful for stores that need consistent image dimensions across large catalogs or multiple page types.
-
Pixc: Photo Resize | Quick Optimiser: Automatically resizes all product images to maintain consistent dimensions. It is designed to help merchants ensure uniform visual presentation across product grids and collection pages.
-
Bulk Resize Photos (external tool): A fast, no-login browser tool for batch resizing images by dimension or percentage before upload. It is suitable for merchants who want to process a large batch of images before uploading to Shopify.
-
ConvertOut – Image Resizer for Shopify: Automatically resizes newly added product images to match the store’s layout. It is particularly relevant for dropshipping stores that import supplier images with inconsistent sizing.
For more details on image resizing best practices and tools, see our full guide: Shopify Image Resizing Guide
Apps for image performance monitoring
These tools help identify image-related performance issues and track ongoing site health.
-
Google PageSpeed Insights: A free tool from Google that audits individual pages and flags image-specific issues such as large file sizes, missing compression, or inefficient formats. Useful for checking real-world speed metrics like LCP.
-
Lighthouse (via Chrome DevTools): This tool provides an in-browser performance audit that checks for unoptimized image dimensions, missing lazy loading, or improper delivery formats. It’s useful for testing image performance in real time during theme development or before publishing layout changes that may affect speed or mobile usability.
-
TinyIMG Reports: A Shopify-integrated dashboard that highlights missing alt text, uncompressed images, and filename issues. Useful for store-wide monitoring when using the TinyIMG app.
-
GTmetrix: Offers visual waterfall reports showing how images (and other assets) load over time. This helps identify which specific images are delaying page rendering or increasing the time to interact.
-
Screaming Frog SEO Spider: A desktop-based crawler that audits your store and lists broken image links, missing alt attributes, and oversized files. It is suitable for detailed image SEO checks at scale.
Conclusion
Optimizing images for Shopify goes beyond uploading high-resolution visuals. It involves compressing, resizing, and properly formatting images to improve speed, SEO, and the shopping experience
In this guide, we covered:
-
What image optimization means and why it matters
-
12 actionable tactics to improve image speed, SEO, and user experience
-
Recommended tools for compressing, resizing, and monitoring image performance
While Shopify helps with automatic compression and CDN delivery, many key optimizations, like resizing, alt text, file naming, and layout-specific image control, are still in your hands.
At On Tap, we help brands get the most out of Shopify through technical audits, theme improvements, and performance-first development. If you need support from Shopify expert agency to optimize your store’s visuals and site speed, get in touch with our team.
FAQs
1. Does Shopify optimize images?
Partly.
Shopify's CDN can serve responsive image sizes and formats such as WebP or AVIF when a browser supports them.
However, Shopify does not rename files, write alt text or resize the original source image for you. Shopify's documentation also states that original images are not compressed when uploaded.
Shopify automatic image optimization therefore handles much of the delivery process, while preparation and metadata still require merchant input.
2. Why are my images blurry on Shopify?
The uploaded image might be too small and is being stretched beyond its intended dimensions, particularly on high-density screens.
For square product photography, around 2048 px is a practical Shopify product image size. Images used for zoom should also be comfortably above 800 × 800 px.
Shopify removes colour profiles during image delivery, so export files in sRGB to reduce unexpected colour changes.
A temporary low-resolution preview that becomes sharper after loading can also be normal lazy-loading behaviour.
3. What size should Shopify product images be?
Shopify recommends 2048 × 2048 px for square product imagery.
That Shopify image size provides enough resolution for detailed product presentation and zoom without requiring excessively large originals.
Shopify product image zoom requires images larger than 800 × 800 px, while around 1024 px is a practical minimum when 2048 px is not available.
Uploads must also remain within Shopify's documented file-size and megapixel limits.
4. How do I reduce image size in Shopify?
Resize the image dimensions first, then apply moderate compression using a tool such as Squoosh or TinyPNG.
This helps reduce image file size without forcing aggressive compression on an unnecessarily large source file.
Within Shopify admin, you can also open a product image under Media, choose Resize, enter the required width and save the change.
For larger catalogues, a Shopify bulk image optimization app can process multiple images more efficiently.
5. How do I compress images without losing quality?
Start by resizing the source image to the dimensions you actually need.
Then apply moderate lossy compression for photography or lossless compression for graphics where every detail needs to be preserved.
Inspect the exported result at full size, particularly around fine texture, shadows and gradients.
The goal is not technically zero quality loss. It is to compress images without losing quality that shoppers can visibly notice.
6. What is the best image format for Shopify?
Use JPEG for most product photography and PNG when you need transparency.
Shopify can automatically serve WebP or AVIF to supported browsers, so most merchants do not need to convert every image manually before uploading.
SVG works well for simple logos and icons.
7. Should I use a Shopify automatic product image optimization app?
A Shopify automatic product image optimization app is most useful when you regularly add large numbers of products or do not want to manually resize and compress every new image.
Look for an app that can process both your existing catalogue and new uploads while retaining backups.
For very small catalogues, manual optimization can still be simpler and gives you more direct control over image quality.