Checkout isn’t just the final step of a purchase — it’s the moment that defines whether a customer completes the journey or drops off. While Shopify’s standard checkout works for many, it often lacks the flexibility to deliver a truly branded and personalised experience. Shopify Plus Checkout changes that, turning checkout into a conversion engine and a loyalty-building touchpoint.
In this guide, we’ll break down what makes the Shopify Plus Checkout different — its advanced customisation capabilities, advantages over the standard checkout, and the key constraints you need to keep in mind. By the end, you’ll know exactly how to customise Shopify Plus Checkout to deliver a smoother, conversion-focused experience that keeps customers coming back.
Unlocking the powerful customisation capabilities of Shopify Plus checkout
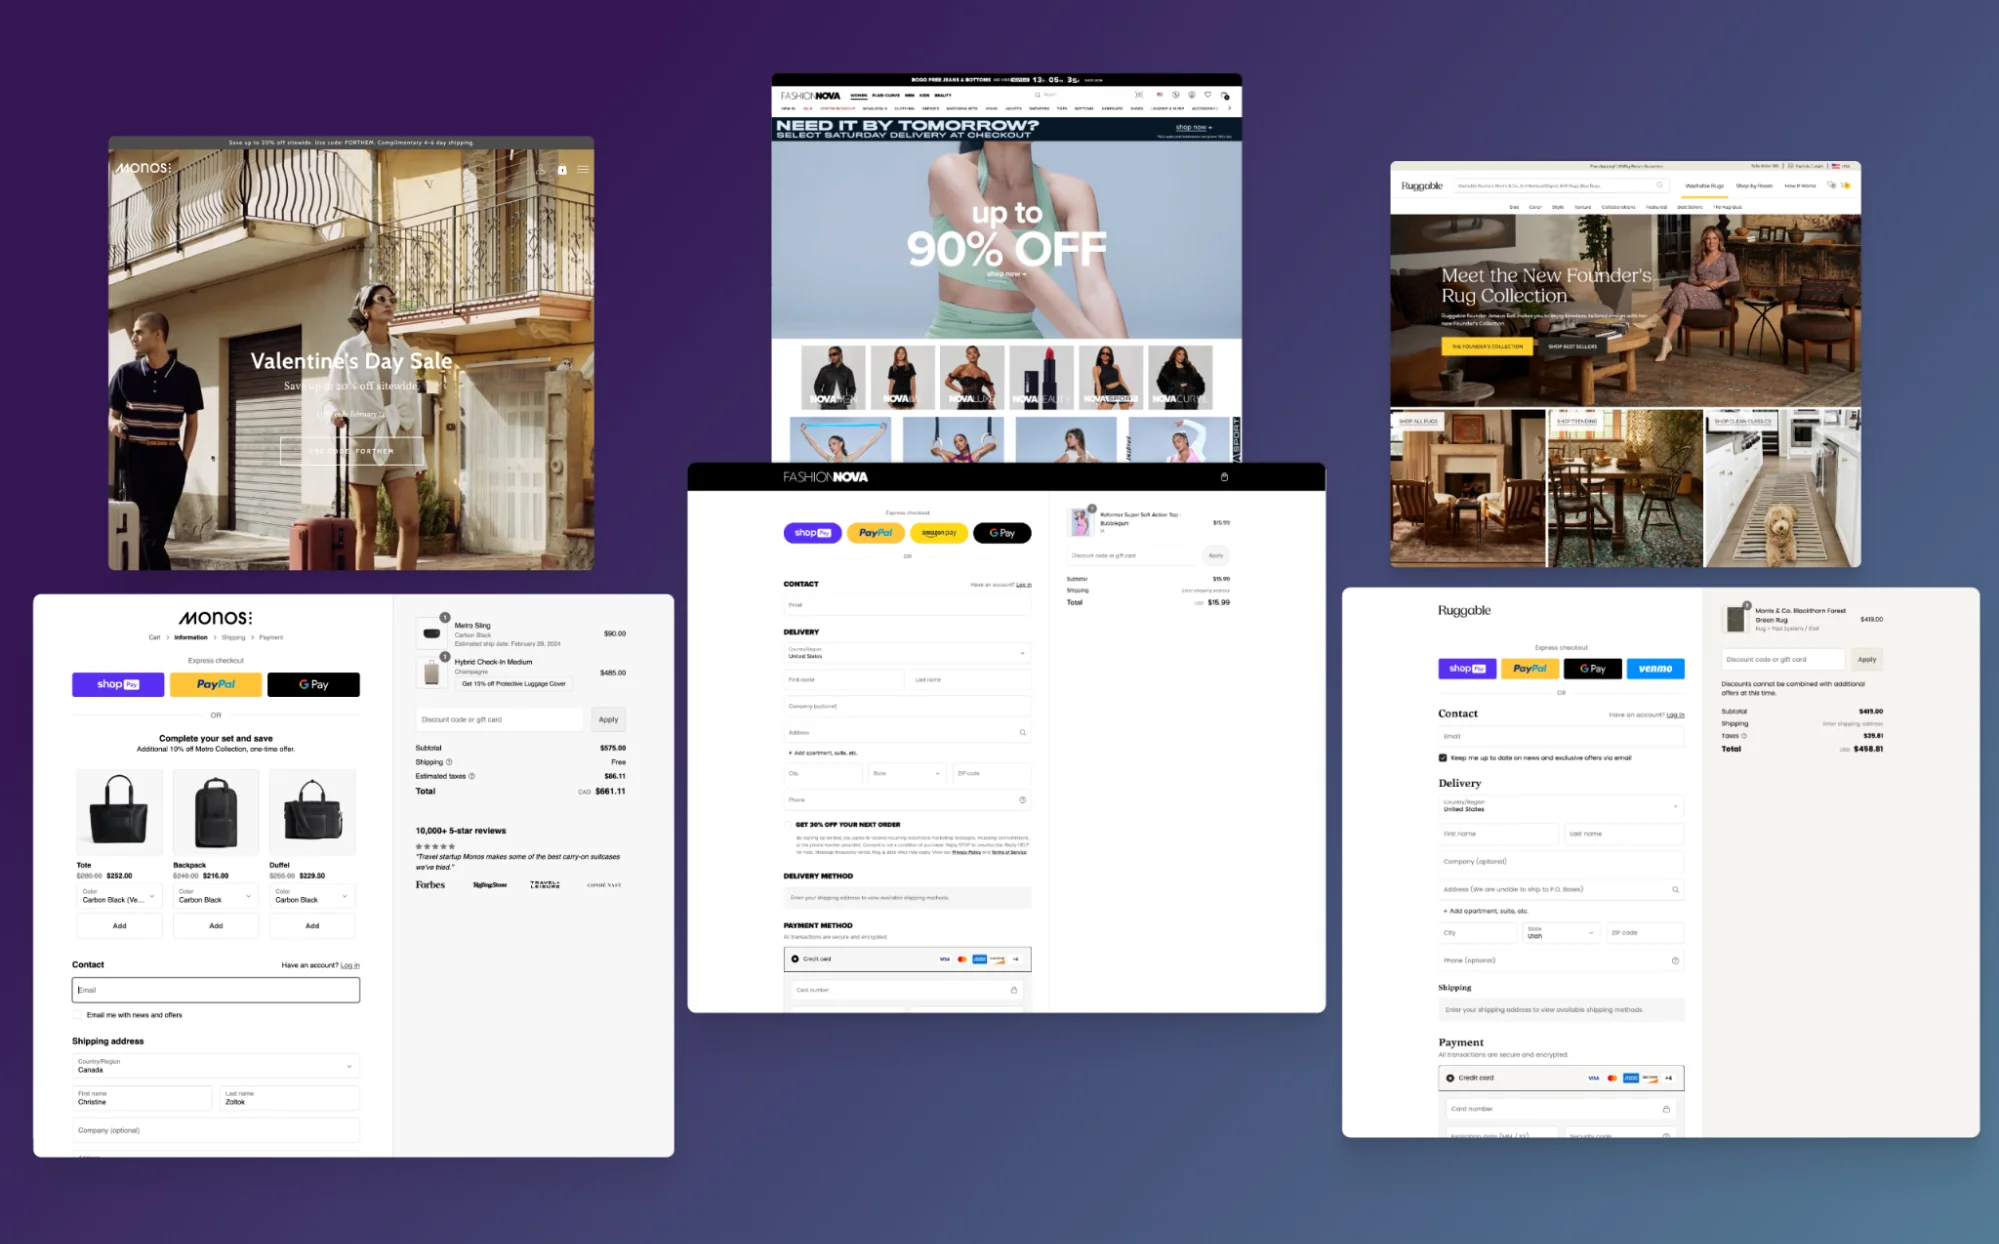
With Shopify Plus checkout, merchants gain access to advanced capabilities for customising the checkout experience. These include adding custom fields, applying branded design elements and localised content, and implementing advanced discount, shipping, and payment logic. Through tools such as Checkout Extensibility, Shopify Functions, and Checkout UI Extensions, merchants can create a faster, more flexible, and conversion-focused checkout experience.
What you can customise on Shopify Plus Checkout
Brand identity: You can upload your logo, set brand colours, choose typography, add trust text, and include policy links. For example, you can add your store logo to the top of the checkout and apply your brand colours to buttons, ensuring a consistent look and feel with your storefront. This provides a seamless brand experience from your homepage to the final purchase.
Checkout layout & flow: On Shopify Plus, you can customise your checkout layout and flow by controlling the step sequence—choosing between multi-step or one-page checkout—placing elements within the Information, Shipping, or Payment steps, and streamlining fields to simplify the process. This is especially useful during flash sales or special events, when switching to a one-page checkout can speed up purchases and reduce cart abandonment.
Custom fields: You can add custom fields to your checkout, such as input boxes, enabling you to collect important information without disrupting the flow. These fields can be used for gift messages, delivery notes, delivery dates, or B2B details such as purchase order numbers or VAT/tax IDs. For example, you could add a delivery instructions box on the Shipping page so customers can provide specific order details.
Promotional & trust elements: With this area, checkout page can feature banners highlighting special offers, trust badges that reassure customers, or localised disclaimers to meet regional requirements. For example, displaying a “Free shipping on orders over $100” banner not only encourages customers to increase their order size but also builds confidence during the purchase process.
Discount logic: Tiered discounts, conditional promotions, and automatic “Buy X, get Y” rules can be applied directly at checkout, enabling advanced promotional strategies. For example, 10% off could be automatically applied when a customer purchases three or more of the same item. Complex pricing rules that go beyond standard discount codes can be implemented using Shopify Scripts.
Shipping rules: Shipping options allow for customisation with free shipping thresholds, conditional rates based on weight, region, or product type, and the ability to hide or show specific methods. For example, shipping presents can be tailored to better suit customers, such as hiding express options for fragile items or offering free shipping on orders above a certain value.
Payment method control: You can limit which payment methods appear at checkout, manage eligibility for “buy now, pay later” services, and enable localised options for different markets. For example, a specific provider like Klarna could be offered exclusively to EU customers.
Checkout Extensions via apps: Apps can add powerful functionality to checkout, including upsells, loyalty point redemption, fraud prevention, age verification, or post-purchase offers, all integrated seamlessly into the flow. For example, a loyalty app might display a section where customers can redeem points for a discount directly during checkout.
Localisation: Shopify Plus Checkout can be adapted for multiple languages, local currencies, and market-specific tax and duty information. For example, customers in France could see the checkout in French with prices displayed in EUR. This is essential for international merchants to create a native, trustworthy shopping experience.
What are the differences between Shopify Plus Checkout and Standard Shopify Checkout?
|
Feature |
Basic/Shopify/ Advanced Plans Checkout |
Shopify Plus Checkout |
|
Branding customisation |
Limited to visual branding (logo, colours, fonts) |
Advanced customisation via Checkout Extensibility (fields, trust badges, banners, design elements) |
|
Checkout flow & UX |
Standard multi-step checkout with minimal editing options |
Option for one-page checkout and tailored customer journeys (B2C & B2B) |
|
Scalability |
Standard performance, no SLA |
Enterprise-grade, 10,000+ checkouts/min, 99.99% SLA, powered by global CDN and cloud infrastructure for stability during peak demand |
|
Discount & logic |
Basic discount codes |
Advanced rules with Shopify Scripts & Functions for tiered pricing, advanced discount, shipping, and payment logic tailored for B2C and B2B |
|
Payment options |
Credit/debit cards and popular mobile wallets (Apple Pay, Google Pay), Buy Now, Pay Later options (BNPL) (like Klarna, Affirm, and Afterpay), and Shop Pay |
All standard methods with added flexibility — control payment options with Scripts and Extensions, plus localised methods for international sales |
|
Integrations |
App-based only, limited to front-end |
Extensive integration with ERP, CRM, loyalty, fraud prevention, and other external systems through Checkout Extensions |
|
Support |
General Shopify Support |
Dedicated Launch Engineer & Merchant Success Manager |

How to customise Shopify Plus checkout for your store
Branding & core design customisation

This type of customisation focuses on aligning your checkout page with your store's visual identity. Unlike standard Shopify plans, Plus gives you more control over the look and feel, ensuring a consistent and professional brand experience from start to finish.
How to configure:
1. Access the Checkout Settings: Log in to your Shopify admin, then navigate to Settings → Checkout. In the Configurations section, click the Customise button to open the specific editor for your checkout page.
2. Upload your logo: Here, you can upload your store logo and display it at the top of the checkout page. You can also adjust the logo’s position (left, centre, or right) and its size to best fit your checkout design. It’s recommended to use a high-resolution image, ideally a transparent PNG.
3. Set brand colours:
- Choose a background colour or upload a background image for your checkout header and main body.
- Customise your button colours (primary and secondary), accent colours, and text colours to match your storefront palette for consistency.
4. Customise typography: Choose a font style for headings and body text from Shopify’s list of system fonts. If you want to use a custom typeface, it must be applied through Checkout Extensibility or custom development.
5. Add policy links and legal copy: In the Policies section, link to your refund, privacy, and terms of service pages. These links appear at the footer of the checkout and are required in many jurisdictions.
6. Customise checkout messaging: Add custom text using the “Additional content & scripts” field (for legacy checkout.liquid) or via checkout editor blocks in Checkout Extensibility. For example, include trust messaging such as “Secure checkout – SSL encrypted” or display shipping notices to reassure customers.
7. Preview and Test:
- Use the “Preview checkout” option to see changes before publishing.
- Run a test order to confirm logos, colours, and fonts display correctly across devices.
Note: If you want to go beyond the default editor settings, Shopify Plus gives you deeper ways to extend branding at checkout:
-
Branded assets with Checkout Extensibility/UI Extensions: Instead of being limited to colours, fonts, and logos, you can insert custom branded elements like trust badges, holiday or localised banners, or promotional highlights directly into predefined extension points in the checkout flow. These blocks are app-powered, so you can manage content dynamically without altering checkout code.
-
Consistent branding with the Branding API: For developers managing multiple Plus stores or international storefronts, the Branding API allows you to programmatically set and update styles (e.g., button colours, background images, typography). This ensures brand consistency at scale and saves time compared to manual updates in each store’s admin.
Checkout flow & page elements customisation
Beyond branding, Shopify Plus provides powerful tools to modify the structure and add custom elements to your checkout page.
Here is a step-by-step guide to configure:
1. Open the checkout editor:
- In your Shopify Plus admin, go to Settings → Checkout.
- If your store is enabled for Checkout Extensibility, you’ll see the Checkout editor interface.
- This editor lets you drag-and-drop UI extensions or app blocks into designated checkout areas (Information, Shipping, Payment).
2. Add blocks in specific steps:
- Click into the step where you want to add content (e.g., Information page, Shipping page, Payment page).
- Select Add app block or Add custom block.
- Examples:
- On Shipping: add a delivery note field.
- On Payment: add a banner about secure transactions or a promo message.
- On Information: add a checkbox for order terms or marketing consent.
3. Adjust Checkout Flow (Multi-step vs. One-page):
- By default, Shopify checkout is multi-step: Information → Shipping → Payment.
- Plus, merchants can streamline this flow by:
- Using apps that consolidate steps into fewer screens (mimicking a one-page checkout).
- Reducing optional fields to speed up completion.
- This is especially useful for flash sales, product drops, or campaigns with high mobile traffic.
4. Preview and test changes:
- Use the Preview checkout option in the editor to see the updated layout.
- Run test orders to confirm added blocks appear correctly and that the flow works across devices (desktop, tablet, mobile).
Example use cases:
-
Delivery note field on the Shipping page → useful for B2B or customers requesting specific delivery instructions.
-
Promo banner on the Payment step → highlight “Free shipping today” or “Secure payment guaranteed.”
-
Streamlined checkout for flash sales → fewer fields and steps, so customers complete orders faster under time pressure.
Business logic & pricing rules customisation
Shopify Plus gives you multiple ways to customise checkout logic, whether it’s dynamic discounts, conditional payment options, or advanced pricing rules. Here are 2 methods you can use to customise business logic and pricing rules in Shopify Plus checkout:
Method 1. Using Shopify Scripts (legacy, to be migrated)
If you are already using Shopify Scripts, you will be presented with three types of scripts to choose from in the Create Scripts:
-
Line item scripts: Used to apply discounts to products in the cart, add free gifts, or create "buy one, get one" offers.
-
Shipping scripts: Used to modify, hide, or rename shipping options and rates. For example, you can offer free express shipping for orders over a certain value.
-
Payment scripts: Used to control available payment gateways based on order properties, customer tags, or cart attributes. (e.g., “Disable Cash on Delivery for international orders”).
You can start with Shopify’s script templates and customise them as needed. The logic is written in Ruby, a programming language used for checkout scripting that’s designed to be simple, readable, and easy to work with. Don’t forget to test the script before publishing.
However, Scripts are being deprecated by June 30, 2026. To remain future-proof, you should begin planning a migration to Shopify Functions, where you can recreate all existing customisations in a more scalable and high-performing way.
Method 2. Using the Checkout Blocks app + Shopify Functions (recommended path)
For long-term flexibility, Shopify recommends combining Checkout Blocks (for visual control) with Shopify Functions (for advanced business logic). Here’s how to set it up:
1. Install and enable Checkout Blocks:
- From your Shopify Admin, go to Apps > Customise your store.
- Install the Checkout Blocks app.
- Open Settings > Checkout and confirm that Checkout Extensibility is enabled.
- Launch the Checkout Blocks app to start creating customisations.
2. Create and configure your custom blocks:
- Inside Checkout Blocks, select the type of customisation you want to add (discounts, delivery options, or payment rules).
- Define conditions for when the block applies, such as:
- Customer tags (e.g., “VIP” or “Wholesale”).
- Cart conditions (e.g., total > $200, includes X product).
- Location (e.g., hide COD outside of the US).
- Save your block configuration.
3. Place blocks visually with the Checkout and Accounts Editor:
- In your Shopify Admin, go to Settings > Checkout > Customise.
- Open the Checkout and Accounts Editor.
- Drag and drop the block you created into the designated extension points (e.g., order summary, payment step, delivery step).
- Preview the checkout to verify placement and visibility.
4. Add advanced logic with Shopify Functions:
- For complex rules, go to Settings > Apps and sales channels > Develop apps (or work with a developer).
- Build a Shopify Function (using Rust, JavaScript, or a supported language). Example: Create a function that applies a 10% discount only if a customer buys 3 or more units of a product.
- Deploy the function to your store.
- Connect your function to a Checkout Block so the logic is executed at the right stage of checkout.
5. Configure B2B pricing rules (if applicable):
- In your Shopify Admin, go to Products > Catalogues.
- Create a catalogue for a specific B2B customer or company location.
- Add quantity rules, tiered pricing, or product-specific discounts. Example: $10 per unit if buying 1–49, $9 per unit if buying 50+, $8 per unit if buying 200+.
- Assign the catalogue to your B2B customers.
6. Test and validate:
- Use Preview checkout to confirm blocks and functions behave as expected.
- Place test orders across different customer types (retail vs. wholesale, tagged vs. untagged).
- Check that custom logic flows into Shopify Admin (e.g., discounts, shipping choices, payment method visibility).
Result: With Checkout Blocks and Functions combined, you get the best of both worlds: easy visual management for marketing and operations teams, and powerful custom logic that developers can scale across multiple stores.
Use cases:
-
Discount logic: Automatic volume-based discounts without needing discount codes.
-
Shipping logic: Free shipping thresholds, hiding specific methods, or region-based conditions.
-
Payment logic: Restrict certain methods for high-value orders, offer BNPL only to eligible customers, or enforce card-only payments for subscriptions.
Checkout functionality customisation
Shopify Plus gives you the flexibility to customise checkout functionality, but this often relies on Checkout Extensions and, in some cases, external integrations. These tools unlock features not supported natively—such as upsells and cross-sells, loyalty rewards, fraud prevention checks, and post-purchase offers—helping you deliver a richer, more personalised checkout experience without sacrificing speed or security.
How to configure:
1. Browse Checkout apps:
- Go to the Shopify App Store → Checkout apps category.
- Choose from apps that provide functionality such as upsells, loyalty redemptions, fraud checks, or post-purchase offers.
- Post-purchase upsells: ReConvert Upsell & Cross Sell!, Aftersell Post Purchase Upsell
- Checkout-integrated upsell widgets: Upsell & Cross Sell — Selleasy
- Loyalty & rewards: Smile: Loyalty Rewards Program, Growave: Loyalty & Wishlist
2. Install & enable with Checkout Extensions:
- After installing, open Settings → Checkout editor.
- Insert the app’s Checkout Extension block into the desired step (Information, Shipping, or Payment).
3. Configure app settings: After installation, go to the app's settings in your Shopify Admin. You'll set up the specific rules for the functionality, such as:
- Which products to upsell?
- What loyalty programs can be redeemed?
- Whether post-purchase offers appear for all orders or only above a threshold.
4. Enterprise system integrations: For enterprise-level merchants, Shopify Plus also offers deep API integrations or middleware connectors. You can connect your checkout to external systems like an ERP (Enterprise Resource Planning) for inventory management, a CRM (Customer Relationship Management) to log customer data, or an OMS (Order Management System) to streamline order fulfilment. These integrations allow for a seamless flow of data between your store and other business systems.
5. Test & validate: Preview the checkout with new app blocks enabled, then run test orders to confirm that the app logic functions correctly and that all data flows properly into Shopify Admin and any connected systems.
Use cases:
-
Upsell/Cross-sell: Offer accessories or product bundles directly at checkout.
-
Loyalty program redemption: Let customers apply or earn loyalty points during checkout.
-
Post-purchase offers: Present a one-click upsell right after payment confirmation.
-
Operational sync: Send checkout/order data instantly to ERP or CRM for fulfilment and customer management.
Shopify Plus Checkout limitations every store should know
While Shopify Plus Checkout is powerful, there are certain limitations that merchants need to understand before planning customisations. These guardrails are designed to keep checkout secure, fast, and consistent across stores, but they do restrict how far you can go with design and functionality.
-
Design and UI constraints: The core structure is fixed, meaning you cannot freely add or remove steps, move core components like the order summary, or inject custom JavaScript/HTML directly. All customisation must be done through Checkout Extensibility's predefined points. This is a deliberate security measure to ensure checkout remains fast, secure, and PCI compliant.
-
API and logic limitations: You can only add extensions in Shopify’s predefined placement areas. Shopify Functions are sandboxed and cannot connect to external APIs or use real-time data from outside your Shopify store. This prevents a slowdown in the checkout process due to external API calls and ensures the integrity of the data. For complex logic that requires external data, you must rely on a backend integration outside of the checkout flow.
-
Payment gateway constraints: Shopify allows only one active credit card processor, and custom gateways require approval. If you use a third-party gateway instead of Shopify Payments on the Shopify Plus plan, you’ll be charged an extra 0.20% per transaction on top of the gateway’s processing fees. This can add up to a significant cost for high-volume merchants.
-
Localisation challenges: While Shopify supports multiple languages and currencies, seamless multi-currency checkout is tied to Shopify Payments, and merchants cannot set unique product prices per currency natively. For example, you cannot manually set a product to be $50 USD and $75 CAD; it will always be a direct conversion based on the current exchange rate. Additionally, if an app doesn't support localised content, parts of the checkout may appear in the default language.
-
Custom scripts limitations: Scripts have a narrow scope and can only affect line items, shipping, or payment options. You are also limited to one active script per type (e.g., one line item script, one shipping script). You cannot create new shipping methods or add arbitrary surcharges. Furthermore, Scripts do not support advanced logic like time-based rules, randomisation, or session-based conditions. All logic must be deterministic and repeatable.
These limitations make expert guidance essential for streamlining Shopify Plus checkout customisation and avoiding roadblocks. With On Tap’s consulting services for Shopify Plus, you gain the expertise to navigate technical constraints, implement advanced features, and create a checkout flow that is seamless, scalable, and optimised for conversions.
Conclusion
Shopify Plus checkout offers a significant leap in customisation and power over standard plans, providing merchants with the tools to create a tailored, conversion-optimised experience. By leveraging Checkout Extensibility, Scripts, and strategic app integrations, you can build a checkout flow that perfectly aligns with your business needs.
If you’re ready to unlock the full potential of Shopify Plus Checkout, our Shopify Plus Development Services can help. With over 19 years of experience in eCommerce and a proven track record in Shopify Plus development, On Tap empowers businesses to maximise the platform’s capabilities. From advanced checkout customisation to continuous optimisation, we provide the expertise to turn your checkout into a powerful growth engine.
Contact us today to discuss how we can help transform your Shopify Plus store.
FAQs
1. What are the features of Shopify Plus checkout?
Shopify Plus checkout provides advanced capabilities that allow merchants to customise both the design and business logic of the checkout experience, including:
-
Checkout design customisation (branding, colours, logos, layout adjustments)
-
Custom fields and checkout content for collecting additional customer information
-
Advanced discount and pricing logic using Shopify Functions
-
Custom shipping rules based on cart value, location, or product type
-
Payment method control for different markets or customer segments
-
Checkout extensibility through Checkout UI Extensions and approved apps
These capabilities help merchants optimise checkout performance while maintaining Shopify’s secure hosted checkout.
2. Can you customise checkout on Shopify without Shopify Plus?
Checkout customisation on standard Shopify plans is limited. Merchants can only make basic branding changes, such as logos, colours, and fonts, through the checkout settings. More advanced customisation, including modifying checkout logic, adding custom fields, or implementing complex discount and payment rules, is available only on Shopify Plus through tools like Checkout Extensibility and Shopify Functions.