Organic search remains one of the most reliable ways for Magento stores to attract high-intent customers and generate sustainable revenue growth. When your store ranks well in search results, potential buyers can discover your products while actively looking for solutions you offer.
Magento provides extensive flexibility for building complex eCommerce websites, but achieving strong search visibility requires understanding how to configure SEO correctly within the platform. Elements such as site structure, metadata, canonical URLs, and page performance all influence how effectively search engines can crawl, interpret, and rank Magento pages.
This guide explains Magento SEO in clear, practical terms. You will learn step-by-step how to optimise key SEO elements directly within Magento, from improving metadata and category structures to addressing technical factors such as page speed and crawlability. The goal is to help you turn organic search into a consistent source of traffic, visibility, and revenue growth.
Key SEO principles every Magento store must follow
Before diving into specific Magento SEO tips, it’s crucial to understand the foundational principles that guide every SEO decision. Following them ensures that any effort you put into optimisation is built on solid ground.
-
Help Google discover your pages: Google can only index and evaluate pages it can find, so discoverability is the first technical requirement for SEO. Magento stores often introduce extra complexity because of deep category hierarchies, pagination, and filter-generated URLs, which can bury important pages under layers of unnecessary structure. The goal is to give Googlebot simple, efficient crawl paths that bring your most valuable pages to the surface while minimising noise from redundant or duplicate URLs.
-
Help Google read and understand your content: Google determines relevance by analysing the content and structure of each page. When signals are unclear, Google may misunderstand the page’s topic or rank it for the wrong queries. Magento’s dynamic layouts, tabbed information blocks, and multi-store setups can add complexity that makes interpretation harder. To ensure Google understands your pages correctly, you need to provide strong content cues through meaningful headings, well-written metadata, consistent canonical rules, clear schema markup and topic-driven internal links.
-
Provide a helpful and high-quality user experience: Google increasingly prioritises sites that deliver fast, stable, and reliable experiences for real users. However, Magento’s default frontend and heavy modules often slow pages down or create instability. Improving load speed, clarity, and trust signals ensures your pages meet Google’s quality expectations and stay competitive in search results.
While these principles outline what every Magento store should prioritise, determining how they map to your own architecture, category structure, or multi-store configuration often requires deeper evaluation. If you want an expert review before making strategic changes, the On Tap Consultancy service can guide you through the right optimisation path.
Magento SEO tips to help Google discover your pages more effectively
Create an XML sitemap that includes all URLs Google needs to discover
An XML sitemap serves as a direct communication channel to Google, ensuring the crawler is aware of all essential URLs and can prioritise crawling without waiting for internal link signals to spread across your site. This leads to more reliable discovery, faster indexation, and a search presence that stays up to date even as your Magento store grows and evolves.
A well-structured sitemap.xml should meet the following criteria:
-
Include all important URLs that you want Google to discover, such as product, category, and CMS pages. You may group URLs by page type to make the sitemap easier to manage.
-
Automatically update the last modified date, so Google knows when a page has been changed and should be re-crawled.
-
Exclude low-value or duplicate URLs, including filter URLs (layered navigation parameters), tag URLs, search result pages, error pages, and any temporary or noindex pages.
Step-by-step to create and submit a sitemap in Magento:
-
Configure sitemap settings: Go to Stores → Configuration → Catalog → XML Sitemap, set the update frequency and priority for Categories, Products, and CMS Pages, and enable automatic daily generation.
-
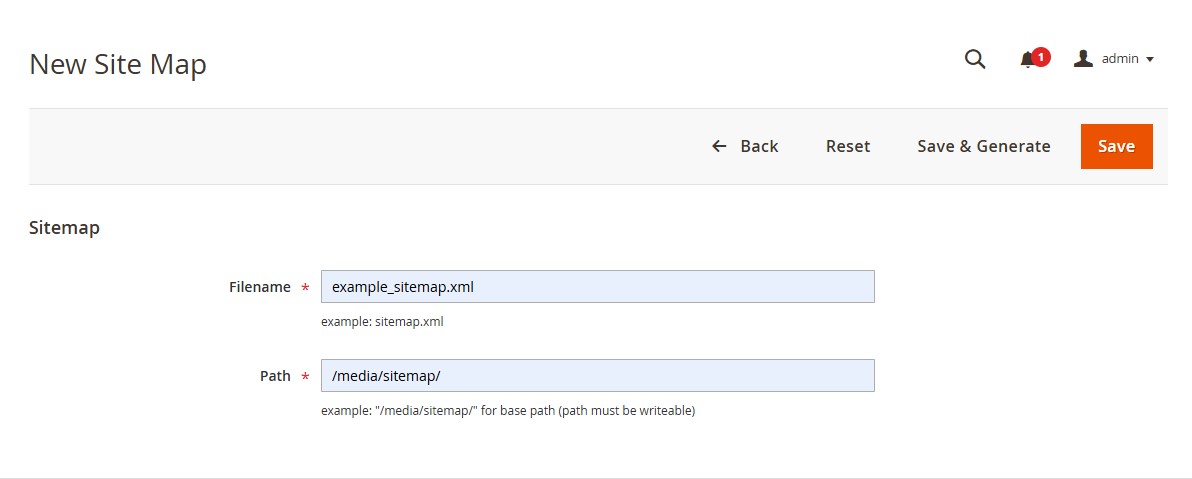
Create the sitemap file: Navigate to Marketing → SEO & Search → Site Map, click Add Sitemap, enter the filename (e.g., sitemap.xml) and the path (/ or /pub/), then select Save & Generate.
-
Verify the sitemap URL: Open the sitemap in your browser (e.g., https://www.yourdomain.com/sitemap.xml) to ensure it loads correctly and contains the expected URLs.
-
Submit the sitemap to Google Search Console: In Google Search Console → Indexing → Sitemaps, paste your sitemap URL and click Submit. Re-submit it whenever you make significant catalogue or URL structure changes so Google always receives the latest version and can crawl new or updated URLs quickly.
-
Regularly review sitemap: Use the sitemaps report in Google Search Console to review errors or warnings, compare submitted vs indexed URLs, and fix issues such as blocked, redirected, or missing pages before expecting full indexation.
Properly configure your robots.txt file
The robots.txt file is an important text file that tells search engines which pages they should or should not crawl. A well-configured robots.txt helps prevent Google and other crawlers from wasting time on low-value or duplicate pages, such as internal search results or filtered URLs. This protects your crawl budget and reduces the risk of unnecessary or harmful pages being indexed.
Principles for configuring your robots.txt file:
-
Disallow low-value or sensitive pages from crawling to prevent wasted crawl budget and keep your index clean.
-
Allow access to essential resources so Google can index your product visuals and other required assets.
-
Declare your XML sitemap location so Googlebot can easily find your key pages and crawl them efficiently.
How to properly configure robots.txt for your Magento store (step-by-step):
1. Identify pages to block or allow:
-
Determine which pages should not be indexed by Google:
-
Internal search pages: These pages provide little SEO value and often generate thin or duplicate content. Example: /catalogsearch/result/?q=shoes.
-
Filtered or layered navigation URLs: Any URL that includes query parameters (such as colour, size or price filters) should be blocked because they create a large number of duplicate or near-duplicate pages. Example: /catalog/category/view/id/123?color=blue.
-
Cart, checkout, and customer account pages: These transactional pages have no SEO value, contain personalised or session-based content, and should never appear in search results. Examples: /checkout/, /customer/account/login/, /customer/account/.
-
At the same time, ensure that you do not block important pages, including: product pages, category pages, blog articles (if applicable), and essential CMS pages such as About Us, Contact, or FAQs. These are the URLs that need to remain accessible to Google and should appear in search results.
2. Edit robots.txt for your Magento store:
-
Go to Content → Design → Configuration.
-
Choose the relevant Store View and click Edit.
-
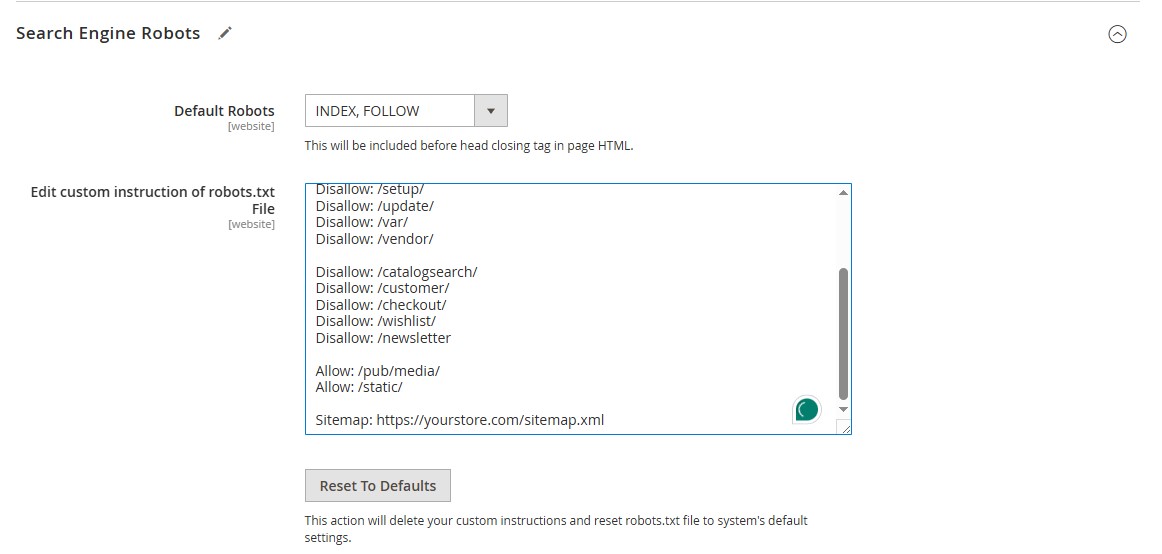
Scroll to the Search Engine Robots section.
-
In the Edit custom instruction of robots.txt File (or similar) field, add your User-agent, Disallow, Allow and Sitemap rules.
3. Add your sitemap URL to robots.txt: An example sitemap is: https://www.example.com/sitemap.xml. This works alongside your submission in Google Search Console and gives search engines another dependable way to discover your sitemap.
4. Test your robots.txt file: Use the robots.txt Tester in Google Search Console to confirm important pages (product, category, CMS) are allowed, and low-value URLs such as search, filter, and account pages are correctly blocked.
Provide breadcrumbs for all pages on the website except the homepage
Google relies on internal links to discover new pages across your site. If a page is not well-connected internally, Google may take longer to discover it or miss it entirely. Breadcrumbs are one of the most reliable ways to create clear, structured pathways that help Googlebot reach deeper content. They show the full navigation trail from the homepage to the current page (e.g., Home → Women → Dresses → Midi Dresses → Product Name), making your site easier for Google to understand and faster to crawl. Breadcrumbs are equally valuable for users, helping them see where they are in your catalogue and move between sections quickly, improving navigation and reducing bounce.
Key principles for implementing breadcrumbs effectively:
-
Show the complete navigational path from the homepage to the current page: Breadcrumbs should reflect the full hierarchy so Google and users understand exactly where the page sits. For example, a product in the “Running Shoes” subcategory should display: Home → Men → Shoes → Running Shoes → Product Name.
-
Ensure breadcrumbs are present in both backend and frontend: They must be present in the code (HTML and schema) for Google to interpret your structure, and displayed on the frontend so users can navigate easily.
How to implement breadcrumbs in Magento 2:
-
Display breadcrumbs in the frontend:
-
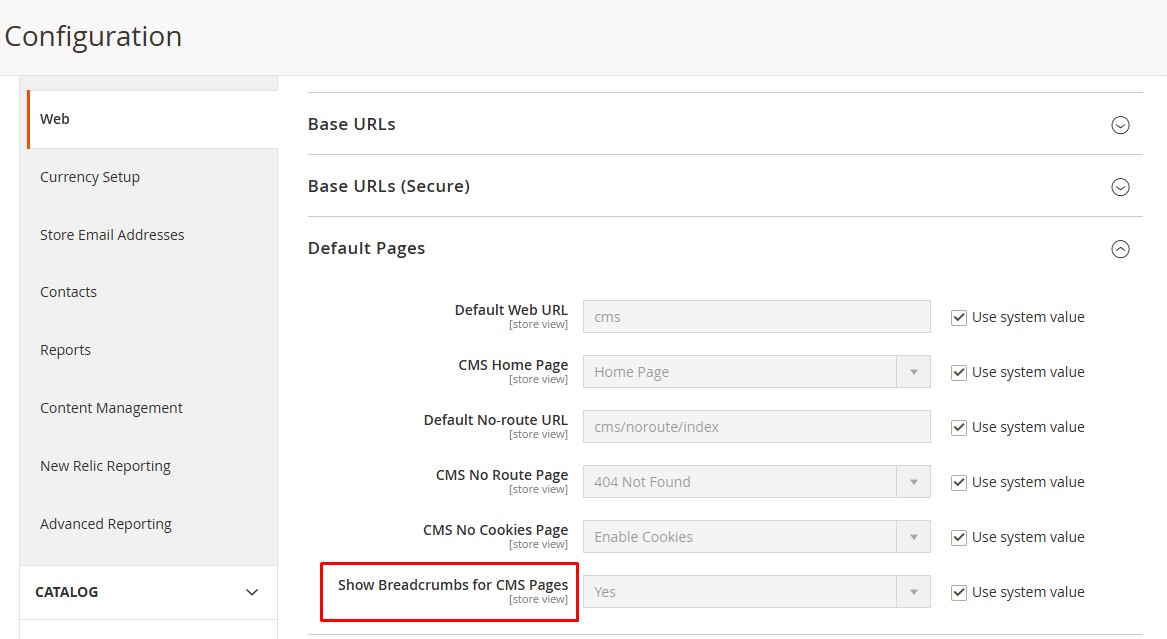
For CMS pages: Go to Admin panel → Stores → Configuration → General → Web → Default pages and set Show Breadcrumbs for CMS Pages to Yes.
-
-
For product page: Make sure the product is assigned to at least one active category; Magento will automatically generate the breadcrumb path based on the category structure.
-
For category page: Organise categories in a hierarchical structure (parent → child → sub-child); placing each category correctly in the category tree ensures breadcrumbs show the proper navigation path.
-
-
Declare breadcrumbs in the layout code: Ensure your theme includes the breadcrumbs block in Magento_Theme/layout/default.xml so Magento can render breadcrumbs globally on the storefront. If a specific page type needs custom breadcrumbs (product, category, or CMS), override the corresponding layout file in your theme, for example:
-
Magento_Catalog/layout/catalog_product_view.xml for product pages.
-
Magento_Catalog/layout/catalog_category_view.xml for category pages.
-
Magento_Cms/layout/cms_page_view.xml for CMS pages.
Configure robot meta tags appropriately for each page
The robots meta tag is an important directive that controls how search engines handle individual pages on your site. Using the correct robots meta tag helps prevent low-value pages from appearing in search results while ensuring your important pages are fully indexed. Here is a typical robot meta tag: <meta name="robots" content="noindex, follow">.
Guidelines for declaring robot meta tags:
-
Noindex: Use this directive when you do not want a page to appear in Google’s search results, but still want Googlebot to follow the links on that page. Example use cases: low-value pages such as internal search results or login pages.
-
Index: This is the default directive. If no noindex tag is added, search engines will automatically index the page. Example use cases: core pages that should rank, including product pages, category pages, and blog articles.
-
Nofollow: Use this directive when you want Googlebot to ignore all links on the page and not pass any link equity. Example use cases: pages with no SEO purpose, such as checkout pages, cart pages, or temporary promotional pages.
-
Follow: This is the default behaviour for most pages and allows Googlebot to follow links on the page, even if the page itself is not indexed. Example use cases: product or category pages that contain important internal links leading to other SEO-relevant pages.
How to configure robot meta tags for a specific page in Magento:
Magento does not provide a built-in feature to configure robot meta tags (index, noindex, follow, nofollow) for individual product pages, category pages, or CMS pages. The default admin panel only allows you to set global robots directives for the entire store.
Because of this limitation, you will need to use a third-party module or a custom-developed solution to control robot meta tags on specific pages.
-
Install a third-party SEO module: Most Magento SEO modules add a “Meta Robots” field directly in the admin interface for products, categories, and CMS pages. This allows you to easily set noindex, nofollow, or any other directive page by page.
-
Override layout: If you prefer a code-based solution, you can add meta robots through a layout XML file. This method allows applying specific robot directives based on conditions such as page type, custom handles or URL patterns. Example layout rule:
<page xmlns:xsi="http://www.w3.org/2001/XMLSchema-instance" xsi:noNamespaceSchemaLocation="urn:magento:framework:View/Layout/etc/page_configuration.xsd">
<head>
<meta name="robots" content="noindex,follow"/>
</head>
</page>
Magento SEO tips to help Google crawl and understand your pages more effectively
Build a logical site structure that accurately reflects your product categories
Googlebot understands your website by crawling the internal links that connect one page to another. The more internal links a page receives, the more important Google considers it. This means a clear, well-organised site structure not only helps Google interpret your catalogue but also directs link authority toward your most important pages, improving their ability to rank.
Strategy to build a logical site structure
-
Identify your most important pages: Start by researching the keywords your potential customers are searching for and evaluating their search volume. Pages that target high-value terms should be positioned prominently in your site structure.
-
Group keywords by search intent: Keywords that share the same purpose or represent similar user needs should be grouped together. Each group should map to a single page on your website (typically a category or subcategory page).
-
Use search volume to shape your hierarchy: Pages that target higher-volume keyword groups should sit higher in your site structure and receive more internal links. Lower-volume or more specific keyword groups should become subcategories.
For example, if “Running Shoes” has significantly more search volume than “Trail Running Shoes,” then “Running Shoes” should be a top-level category, with “Trail Running Shoes” as a subcategory beneath it.
How to build a logical site structure for your Magento store:

1. Go to Admin → Catalog → Categories, where you can view and shape your entire site hierarchy.
2. Create a parent category based on a primary keyword group: This parent category captures a high-priority keyword group and functions as a core hub for internal links across your site.
-
-
Select the top-level category container (e.g., Default Category).
-
Click Add Subcategory.
-
Enter the Category Name and URL Key that reflect the main keyword group (e.g., Running Shoes).
-
Enable the category and configure Display Settings based on how you want the page to present products and content.
-
Click Save Category.
-
3. Create child categories that match more specific keyword groups: Each child category reinforces topical relevance and strengthens Google’s understanding of your hierarchy.
-
-
Click the parent category you just created.
-
Select Add Subcategory again.
-
Name the category according to a more specific keyword cluster (e.g., Trail Running Shoes, Lightweight Running Shoes).
-
Adjust Display Settings, SEO settings, and product associations.
-
Click Save Category.
-
4. Build deeper levels only when search intent justifies it: Magento allows multi-level structures, but only creates additional layers if keyword research shows a clear sub-intent. For example: Shoes → Running Shoes → Trail Running Shoes → Waterproof Trail Shoes.
5. Assign products to the correct category levels: This ensures internal links flow naturally toward the right pages, improving discoverability and ranking strength for key categories.
-
-
Go to Catalog → Products.
-
Edit a product and scroll to the Categories field.
-
Assign the product to the most relevant parent and child categories.
-
6. Review the hierarchy on the storefront: To ensure that the structure is easy for both users and Google to understand, you need to check that:
-
-
The navigation reflects your keyword-driven hierarchy.
-
Breadcrumbs show the correct path.
-
Products appear in their intended categories.
-
Interlink pages based on their topical relevance
Internal linking based on topical relevance helps Google understand the context, relationships, and depth of your content. This is a key factor in building topical authority, which makes it easier for your website to rank for entire keyword groups rather than individual terms. When your pages interlink around related topics, Google sees your store as a reliable resource within that subject area.
The principle for building topical internal links is to map out topic clusters for your Magento site. Create a clear organisational structure for your content by grouping pages into topic clusters. This gives Google a strong, coherent signal about the subjects your website specialises in.
-
Identify the core topics your store covers: Determine the main topics based on your products and customer search behaviour. These topics form the foundation for how you plan and organise internal links.
-
List all related page types within each topic: For every topic cluster, map out all relevant pages, including category pages, product pages, blog articles or buying guides, and supporting CMS pages. These pages form the backbone of your topical internal linking strategy.
-
Create internal links within each topic cluster: Connect pages that share the same topical relevance to help Google understand their relationship. Recommended linking paths include:
-
Category ↔ Subcategory pages.
-
Category ↔ Product pages.
-
Product ↔ Related product suggestions.
-
Blog/content pages ↔ Product pages they reference.
Note: Magento automatically generates certain internal links, such as links from subcategories to their parent categories, and links from product pages back to their assigned categories via menu (top navigation) and breadcrumbs. All other linking paths should be created manually to strengthen your topic clusters.
Here are detailed configuration steps:
1. Link from categories to subcategories:
-
Method 1: Use CMS content on category pages: Adding descriptive text to category pages allows you to place natural anchor-text internal links pointing to related subcategories. This reinforces hierarchy and improves topical clarity.
-
Go to Catalog → Categories.
-
Select a parent category you want to edit.
-
Add descriptive content under Content and insert anchor-text links to relevant subcategories.
-
Save the category.
-
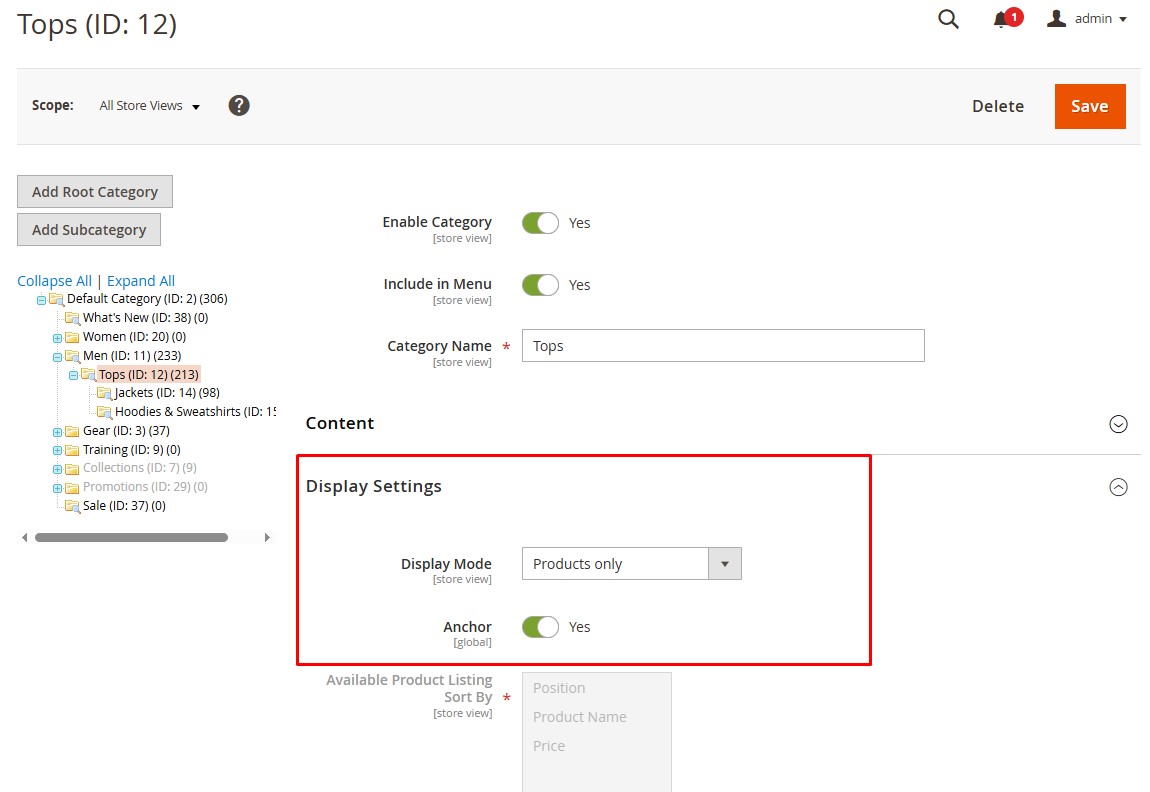
Method 2: Use the layered navigation bar: Layered navigation can also create internal links from a parent category to its subcategories. When enabled, the parent category page will display a “Category” filter listing the relevant subcategories. These links help Google understand the hierarchy and topical relationships within your catalogue.
-
Go to Catalog → Categories and select the parent category.
-
In Display Settings, set Anchor = Yes to enable layered navigation on the parent category page.
-
For each subcategory you want to show in layered navigation, Enable Category = Yes and make sure it has visible products assigned.
-
Reindex, clear cache, and visit the parent category page and confirm the “Category” filter appears with your selected subcategories listed.
2. Link from categories to product pages: To generate internal links from a category to its product pages, the product must appear in the category listing. Simply assign the product to the correct categories and make sure both the product and the category are enabled. Magento will then display the product on those category pages and create the internal links automatically.
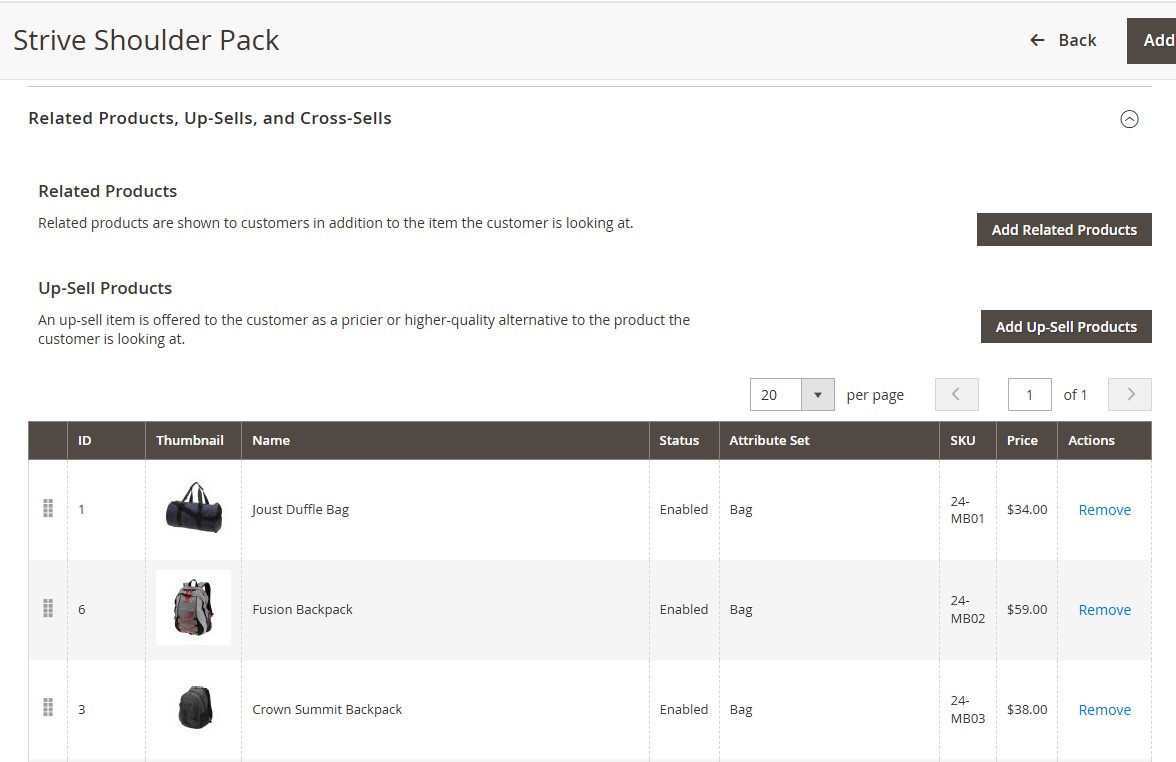
3. Link among product pages using related products, up-sells and cross-sells: Adding product recommendations is the simplest way to interlink product pages, helping Google understand their relationships and improving discoverability.
-
Go to Catalog → Products.
-
Select the product you want to edit.
-
Scroll to Related Products, Up-Sells and Cross-Sells.
-
Click Add Products.
-
Search and select relevant items.
-
Save the product.
4. Link from content pages to product pages using blog articles and CMS pages: Content pages allow you to link naturally to categories and products using keyword-rich anchor text, supporting both SEO and conversions.
-
Go to Content → Pages or your blog module.
-
Open a blog post or CMS page.
-
Highlight relevant text and click Insert/Edit Link.
-
Add links to product pages, category pages or related articles.
-
Save the page.
Apply schema markup appropriately across all pages
Schema markup is structured data added to your website’s code to help Google better understand the meaning and purpose of each page. Applying the correct schema types across your Magento store supports clearer indexing, richer search appearance, and stronger topical signals.
Schema types and where to apply them:
-
Organisation/Local Business schema: Use this on your homepage and key business information pages (About Us, Contact, Store Information). Organisation is suitable for online-only brands; Local Business is recommended if you operate physical locations or service areas.
-
Product schema: Apply this to every product detail page. This helps Google extract product name, SKU, price, availability, description, and review data, improving visibility in product-rich results.
-
Breadcrumb schema: Use this on all pages that display breadcrumbs. Breadcrumb schema allows Google to understand your site hierarchy and can enhance breadcrumb display directly in search results.
-
Article schema: Apply this to blog posts, guides, and editorial content. It helps Google recognise article-type pages and improves chances of appearing in news or discovery surfaces.
Best practices when using schema markup for Magento stores:
-
Ensure schema is accurate and consistent across all similar page types: Google checks structured data against the visible content on the page, so your schema must accurately reflect what users see. At the same time, product pages, category pages, CMS content and blog posts should each follow a consistent schema format.
-
Avoid duplicate or conflicting schema on a single page: Do not apply multiple primary schema types (e.g., Product + Article) to the same page unless it truly fits both. Conflicting markup can confuse Google and reduce rich result eligibility.
-
Ensure key attributes are complete and up to date: Structured data should always reflect the current state of your catalogue, including price, stock status, reviews and product identifiers.
-
Use a reputable SEO module if Magento defaults are not sufficient: Magento does not provide comprehensive schema coverage out of the box. A well-supported module helps automate schema generation and reduces the chance of formatting errors.
-
Validate your structured data regularly: Use Google’s Rich Results Test or Schema Markup Validator to check for errors, missing fields, or warnings, especially after theme updates or catalogue changes.
Optimise meta title and description to clearly communicate each page’s content
Meta tags, including the meta title and meta description, help Google understand the topic and purpose of a page. Clear, well-written meta tags improve how your pages are interpreted and displayed in search results, and they also enhance click-through rate by giving users a compelling reason to choose your page over others.
Every page on your Magento site needs properly optimised meta tags:
-
Meta title: Your meta title acts as the main indicator of the page’s focus, allowing search engines to understand its core topic. Follow these best practices to craft an effective meta title:
-
Keep it under 60 characters to avoid truncation.
-
Include the primary keyword for the page.
-
Describe the content accurately to avoid keyword cannibalisation or misleading titles.
-
For product pages: include brand + product name + key attribute (if helpful).
-
For category pages: include category name + key modifier (e.g., “Buy Running Shoes Online”).
-
Meta description: Your meta description gives users a quick, compelling snapshot of your page’s value, helping them decide to click. When writing meta descriptions, make sure to:
-
Write 140 - 160 characters.
-
Include secondary keywords or your unique selling point.
-
Highlight why the user should choose your page (e.g., free shipping, wide selection, trusted brand).
-
Ensure the description aligns with actual on-page content.
Steps to set up meta tags in Magento 2
-
To add meta tags in Magento 2 manually:
-
Go to Catalog → Products (for product pages) or Catalog → Categories (for category pages).
-
Select the product or catalogue you want to edit.
-
Open the Search Engine Optimisation section.
-
Fill in the meta title and meta description fields following the best practices outlined above.
-
Save your changes.
-
To set meta tags automatically in Magento 2 in bulk:
-
Go to Stores → Configuration.
-
Navigate to Catalog → Catalog.
-
Scroll to Product Fields Auto-Generation.
-
Set your meta tag templates, for example:
-
Meta Title Template: {{name}} | Buy Online.
-
Meta Description Template: Shop {{name}} at the best price. {{short_description}}.
-
Click Save Config.
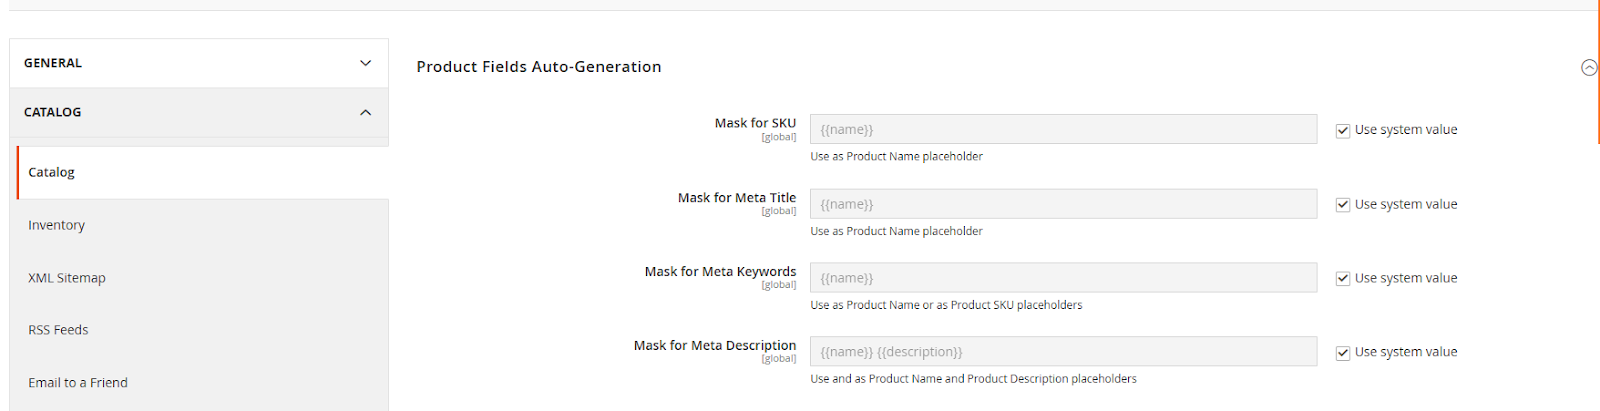
Note:
-
Magento only allows one global metadata template for products, meaning auto-generated category meta titles and descriptions must be set via modules.
-
Auto-generation applies only when metadata fields are empty, so existing meta tags cannot be updated automatically.
-
Template functionality supports very limited variables (e.g., {{name}}, {{short_description}}, {{sku}}) and cannot use advanced attributes like brand, size, material, or custom fields.
Clearly define the relationships between language versions on the website
Magento multilingual websites often contain multiple language versions of the same content, for example, a product page available in English, Vietnamese, French, and more. If these versions are not clearly declared as related, Google may interpret them as duplicate content. This can result in only one version being indexed, weaker overall site quality signals, and reduced visibility in each target market.
To prevent these issues, it’s essential to explicitly define the relationships between all language versions of each page.
-
Use language-specific subfolders: Organise each language version under a dedicated subfolder to help Google clearly understand language separation. For example, /en/ for English, /fr/ for French, /vi/ for Vietnamese.
-
Add locale identifiers for regional targeting: If one language serves multiple markets, use locale-specific paths. For example, /en-us/ for the United States, /en-uk/ for the United Kingdom, /fr-ca/ for French-speaking Canada.
-
Implement hreflang (rel="alternate") tags: Add hreflang annotations on every page to indicate all translated versions and prevent duplicate content misunderstandings.
-
Set canonical to the same-language page: Each page should point its canonical tag to itself to avoid cross-language canonical conflicts.
How to set up language folders and declare multilingual structure in Magento 2:
-
Step 1: Setting up language-specific subfolders
-
Create store views for each language: Go to Stores → All Stores and create a separate store view for each language (e.g., English, French, Vietnamese).
-
Assign subfolders for each language:
-
Go to Admin → Stores → Configuration.
-
In the top-left “Store View” selector, switch to the language store view.
-
Go to General → Web.
-
Set base URL for each store view, for example: https://example.com/en/, and repeat for other languages.
-
Configure URL structures with language folders: Enable Add Store Code to URLs.This ensures URLs follow a clear structure, such as /en/, /fr/, /vi/.
-
Set the locale for each store view: Go to Stores → Configuration → General → Locale Options and choose the appropriate locale for each store view (e.g., English (US), French (France), Vietnamese).
-
Step 2: Declaring multilingual settings and canonicals
-
Install language packs: Download and install the necessary language packs for your desired languages. This can be done via Composer or by manually placing the language pack files in app/i18n or app/design/frontend/{Vendorname}/{themename}/i18n.
-
Implement Hreflang tags declarations: For each store view, declare its relationship with other language versions by setting up hreflang tags. Make sure each page references all other language equivalents.
-
Ensure canonical is set per store view: Verify that every language version has a canonical URL pointing to itself, not to another language. This prevents Google from merging language variants.
Magento SEO tips to help improve user experience on the website
Optimise Core Web Vitals to meet Google’s standards
Core Web Vitals (CWVs) are essential performance metrics that directly impact user experience and are recognised by Google as official ranking signals. You can measure these metrics using tools like PageSpeed Insights or Google Search Console.
Magento websites, especially those running the default Luma theme, often struggle with CWVs due to heavy frontend assets, render-blocking scripts, layout instability, and outdated frontend architecture.
To improve your CWV performance, focus on optimising the three key metrics:
-
LCP (Largest Contentful Paint) shows how quickly the main visible content, often a hero banner or large product image, loads. Faster LCP helps users see meaningful content sooner. Target: < 2.5s.
-
INP (Interaction to Next Paint) measures how responsive the page feels when users interact with it, replacing the older FID metric. A low INP ensures smooth, immediate feedback. Target: < 200ms.
-
CLS (Cumulative Layout Shift) tracks unexpected layout movements during loading that can disrupt the user experience. A stable layout lowers frustration and improves usability. Target: < 0.1.
Typical areas that require optimisation include:
-
Image optimisation (WebP, lazy load, proper sizing).
-
Reducing or deferring JavaScript.
-
Minimising unused CSS.
-
Optimising server response time and caching.
-
Cleaning third-party scripts and heavy widgets.
-
Improving layout stability (proper image dimensions, banner loading behaviour).
However, instead of manually fixing each performance issue one by one, a much faster and more sustainable solution is to switch to the Hyvä theme. By replacing Magento’s legacy frontend with a modern, lightweight architecture, Hyvä dramatically boosts Core Web Vitals and often delivers near-perfect scores right out of the box. Discover how our Hyvä development services can help you make the most of Hyvä and achieve stronger performance outcomes.
Sometimes, switching to Hyvä alone is not enough. While Hyvä delivers a major improvement at the frontend layer, it does not resolve deeper structural issues in the backend, such as legacy business logic, inefficient integrations, or accumulated technical debt. In these cases, Core Web Vitals optimisation becomes slow, fragile, and difficult to sustain.
This is where rebuilding on Carbon becomes the more effective path forward. Carbon is a rapid-deployment system for Magento and Adobe Commerce that allows merchants to move onto a high-performance, Hyvä-based framework while retaining full flexibility and scalability. Unlike a standard theme rebuild, Carbon delivers consistently strong Core Web Vitals across both frontend and system-level performance, a cleaner and more efficient architecture, faster development and maintenance, and stronger, more reliable SEO foundations. With Hyvä CMS built in, managing meta tags, canonical URLs, and structured data is significantly simpler and more intuitive than on the Luma stack.
Provide clear, visual product content that fully supports purchase decisions
Google prioritises product pages with complete, helpful, and visually clear content because it signals strong page quality and a positive user experience. To maximise both SEO performance and conversion rates, make sure every product page follows these key principles of helpful content:
-
High-quality product image:
-
Use high-resolution images optimised in WebP or AVIF for faster loading.
-
Include multiple angles: front, back, side, and close-up details.
-
Add lifestyle or in-use photos to help shoppers visualise the product.
-
Keep image dimensions consistent to prevent CLS and improve Core Web Vitals.
-
Product videos:
-
Use 360° videos or short feature demos that highlight the product’s key features and help customers understand the item quickly.
-
Use review or unboxing videos to build trust and credibility.
-
Clear product descriptions written for humans
-
Write unique, comprehensive descriptions; avoid copying vendor content.
-
Use bullet points to keep the content easy to scan.
-
Clearly explain what the product is, who it’s for, what value it delivers, and how it’s used in real-life situations
-
Specification tables: Present key technical information (size, materials, dimensions…) using HTML tables. Structured data in table format helps Google understand the content better and supports rich result eligibility.
-
Trust elements inside product pages: Include reviews, ratings, and relevant certifications or badges. Strong social proof improves user confidence and signals product quality to Google.
Steps to create helpful content for Magento stores:
-
Upload high-quality visual content:
-
Go to Catalog → Products → Images and Videos:
-
Convert images to WebP/AVIF using online tools or a WebP conversion module for automatic optimisation.
-
Upload images and assign them to the correct roles, like Base, Small, and Thumbnail.
-
Add product videos: In Images and Videos, click Add Video, then insert a YouTube, Vimeo or self-hosted link.
-
Create rich product descriptions: Go to Catalog → Products → Product Details and use the WYSIWYG editor to add content following the best practices above.
-
Add specification tables: Insert HTML tables into the description or create Product Attributes so Magento automatically displays structured details under Additional Information.
-
Enable product reviews: Go to Stores → Configuration → Catalog → Catalog → Product Reviews and enable reviews and ratings, and allow customers to upload images for stronger authenticity.
Keep your Magento SEO healthy with ongoing monitoring
SEO is not a one-off task; it is a continuous optimisation process. Rankings, visibility, and technical health depend on how consistently your site maintains accurate signals over time. As your store grows, new products are added, categories are reorganised, content is updated, and modules or themes evolve. Each of these changes affects the technical elements Google relies on, including metadata, structured data, internal links, canonical rules and performance metrics.
These demands become even more challenging for SEO on Magento, where large catalogues, deep hierarchies, multiple store views, and frequent product or content updates are common. With so many moving parts changing regularly, manual monitoring is not practical at scale; it is time-consuming, inconsistent, and prone to human error.
This is where Audit IQ becomes essential. Audit IQ is a proactive, automated monitoring platform built specifically for Magento. It checks your store 24/7 for technical, SEO, and performance issues and alerts you whenever something changes or breaks. By catching problems early, Audit IQ keeps your SEO foundation intact and reduces the long-term risk of ranking drops or indexation failures.
What Audit IQ helps with:
-
Detects broken links, 404 errors and redirect issues.
-
Flags missing, duplicated, or inconsistent meta tags.
-
Identifies indexation problems (blocked URLs, noindex tags, canonical conflicts).
-
Monitors performance regressions that affect Core Web Vitals.
-
Alerts you to theme or module changes that may unintentionally break SEO components.
-
Provides continuous insights rather than relying on occasional manual audits.
Conclusion
Optimising SEO for Magento stores is an ongoing effort that requires attention to structure, content quality, and technical stability. By applying the strategies outlined in this guide – from strengthening discoverability and clarity to improving user experience – you create a solid framework for long-term organic growth.
However, Magento’s dynamic nature means your SEO setup will continue to change. Updates to products, categories, themes, and extensions inevitably introduce new technical challenges. Audit IQ by On Tap removes this burden by automating ongoing monitoring, alerting you to issues as they arise, and helping you maintain a healthy technical foundation as your store grows.
If you need expert support implementing these Magento SEO best practices or want a partner to elevate your organic performance, On Tap’s Digital Marketing services can help. Our team specialises in technical SEO, content optimisation, CRO, and long-term growth strategies tailored for Magento stores. With decades of experience in eCommerce, we provide the audits, optimisation programs, and strategic guidance needed to keep your store performing at its best.
To discuss your goals or explore how we can support your SEO and digital marketing roadmap, get in touch with us today.